Tuesday, September 30, 2014

Star Cards--Embossed

This top-fold card was just SO much fun to create.  I used SU's designer paper from last year's paper pack with the polka dots on Old Olive cardstock.  The fir Branches are a Martha Stewart punch (one of my favs) burnished with  Tim Holtz Distress ink (Forest Moss).  The stars are die cut from SU Stars  Framelits 133723.  The largest star, cut from holographic paper that has stars on it is hung from the branches with pearl cotton that I pulled across my  Forest Moss sponge to color slightly. The ribbon trim is gold 1/4 inch ribbon from my stash. The natural textured paper is embossed with  Tim Holtz Christmas and  Thin Ice set  (Sizzix 657059). 


 The stars are die cut from SU gold cardstock using SU Stars Framelits #133723 after they have been stamped and gold embossed using the Bright and Beautiful #135020 stamps for the stars, and SU Gold EP.   The starry edge is a SU  Confetti Stars Punch #135861 and the sentiment is from SU Delightful Dozen #122652


Below are two more cards using the same punch, sentiments, stamps and dies as above.  Some of the stars are cut from star holographic paper.  The Card on the left also tries out the  Stampin Up Mask #133777 with a gold Wink of Stella Brush painting in the stars, also stars from a punch and from the confetti punch are on that star-studded card.

This one uses the SU EF#135817.  There's a lot of texture difference on this card,  which is edged with Starform Gold Outline stickers. The sentiment is a sticker also;  I get all my stickers from Pop-Ups Etc.


Monday, September 29, 2014

StampinUp Workshop

Today my neighbor SU Demonstrator Kathy Legan hosted another wonderful card-making workshop.  We made three cards today, using various techniques and StampinUP products. The    Boo to You Happy Halloween card is embossed and cut out white paper with a vellum ghost cutout. 
The Give Thanks  door is created with the woodgrain stamp and the  Wonderous Wreath stampset. and the Thank you card is in the  gorgeous new color this year Blackberery Bliss, and uses designer paper and the Thanks stamp from Seasonally Scattered stampset.  


Snowflake Blizzard

These cards were inspired by the new (public--and members only) tutorial by Sandi MacIver in her Snowflake Soiree video. I used snowflake stamps from SU's Best of Snow set, and snowflakes from Tim Holtz Reindeer Flight set.  The sentiment is stamped from Inkadinka Do Christmas clearstamp set, and the colors I used were SU's Island Indigo, Old Olive and Crumb Cake as demonstrated in Sandi's video.

Sunday, September 28, 2014

Christmas is on its way!

This is a 5x5 card created with Die'sire Create a Card, Starry Night. I used Stampin Up's Bright and Beautiful Star die cut from glitter paper (Walmart), and Inkadinkado's Christmas is on its way stamp.  The paper and ink are  SU's Shimmer and Night of Navy.  The accent stars are from the Create a  Card die and various star shaped punches, accented with little rhinestones.


Sunflower Quilled Card

Ever since Philippa Reid presented several articles on  Quilling in the September 2011 Papers and Pixels Magazine (no longer available), I have wanted to try my hand at this beautiful art form.   Recently Philippa received even  more international awards for her amazing work.  Don't miss her Blog if you want to see how incredibly beautiful quilling can be!  
This card was created specifically for the Joan's Touch Challenge this week where we were to use a fall theme an embossed bkg and something we have altered that we have already cut or used.  I had already cut the romantic rectangles (Spellbinders S5-161) from sandable core-dinations paper that I got a couple of years ago.  That particular die includes both cutwork and embossing.  The sentiment "Wishing you Happiness Around Every Corner" is a   TLC Creations Circular sentiment, altered, colored and resized for this card.  The background for the sentiment has been sponged with  Cappuccino Delight, Kaleidacolor Ink. And finally the very center of my "sunflower" has a tight quilled roll surrounded with a splash of brown glitter glue and a teeny bit of Distress ink sponging. The quilled Sunflower is my own "creation" working somewhat with a combination of tutorials and tutorial videos I found online:  This one is from E-How.  Basic Idea came from a site like this and here's a good  Basic Quilling page to help get you started on the seven basic shapes.  The best tutorials I found were in Dutch or German, but just viewing them and stopping and studying each step worked for this first time quiller. 

I bought a Quilling Board from Terri at Joan's Gardens.  It was manufactured by Marianne Designs and was great for learning how to pin and work a flower, and to practice sizing the scrolls as I made them and then glued them together.  This Quilling board does NOT come with any instructions at all, but available for purchase with it is a Marianne Designs Catalog.  This catalog was SO helpful, and links to the Marianne site with project ideas was great.  It is tricky to get the quilling to stick to the cardstock, but I liked the way Glue N  Seal (also available at Joan's Gardens) and  Zip Dry worked.  I also tried 3d Glaze, but it didn't seem to dry fast enough.  I held the base of each quilled piece until dry with tiny clothespins that I had seen in one of the online demos for quilling.   
   Spend some time and search pinterest and the online quiller's sites for information on how to do this.  It is time-consuming, fun, pretty, unusual, and totally unique!  Originally I had a tied grosgrain ribbon under the corner quilling because the ribbon had fall leaves on it, but it overpowered the quilling, so I settled for fall theme colors and a sunflower for the challenge.

Priss tip:  Do loops like y ou see on the flower on a Quilling Comb instead of pin-board.  Faster, easier and glues much more easily.  (A Quilling Comb is also an "onion holder" in your kitchen store and is also on Amazon)


Friday, September 26, 2014

Owl Thanksgiving REmake

This card was created exclusively for Joan's Touch Challenge this week which is to do a fall theme, alter things we have already cut or used, and use an embossed background.  This owl was embossed eons ago (and I didn't like the depth of the embossing then) using paper from Michaels.  It is one of my first EF's and is a Cuttlebug EF.  
I sponged Tim Holtz Tea Die Distressing ink on the embossing and fussy cut out the corner, adhering it over one of the background papers designed by JJ Bachetold in her kit Fall Frolic.  That photo paper print is DOUBLE embossed with Tim Holtz Texture fades EF Retro Cirque Set.  I embossed one side, turned the paper over and embossed it again.  It is very hard to see detail on figured photo paper but the positive negative embossing is a fun thing to try and worked well on this card.   The Happy Thanksgiving is a stamp from a bag of clear stamps older than dirt in my stash--I have no idea who designed this sentiment  stamp, but it is cut out with Spellbinders Leaves S4-321.  The corn and sheaf and bow and acorns and leaves are from the same sack of old embellies that are marked "fall stuff!" in my bin!  I THINK they are EK stickers. The leaves under the leaftag are by EK.  The detail on the owl corner is touched over with (Sakura) Gelly Roll glitter pen.  Almost all of these dies and the inks are available at Joan's Gardens.  It was fun to use stash stuff and previously cut or used product that had been at one time rejected. Thanks for the challenge Joan.

Coffee Filter Poinsettias

These two cards were made with Poinsettias from the Spellbinders Layer's Poinsettia Dies (S5-055) They are brushed with Tim Holtz Distressing Inks (Festive Berries, Barn Door and Tea Die), spritzed with Pearl Tattered Angels spray-- and then finished with Gelly Roll pens.  The top card is layered onto Stampin Up's Holiday Frame EF, and the tag sentiment is a stamp by an Inkadinkao Christmas set.   The lower card's sentiment is a Teeny Tiny Wishes stamp by SU.  That card's flowers are centered with quilled paper centers and punched leaves.  The Holly border is  VersaMark ink on Cherry Cobbler (SU) paper, and the tiny embossed frame under the flower is one of SU's Textured Impressions, (Designer Frames)--a really really old EF I had.


Wednesday, September 24, 2014

Alcohol Inking

These two alcohol inked backgrounds are similar to a technique at Splitcoast Stampers Called Alcohol Ink Marbling taught today by Audrie Magno-Gordon.  I used Jacquard Pinata Alcohol Inks as well as Adirondack Alcohol Inks (by Tim Holtz).  I varied the technique a little--instead of using a ziploc bag for ink transfer I used a piece of acrylic. (NOT a good idea because it becomes unusable after you have used it a time or two.  ON the Halloween Card, the graphic is from my stash.  I added it to my files in 2004 and have NO idea who drew the jack-o'-lantern. The little rhinestone cat and moon came from Michaels and the Happy Halloween sticker is a Dazzles Halloween Sticker.


The card below is inked in the same inks (different color palette) with the Jacquard Inks.  I had some voids in that one and found that Copic markers blended perfectly when inked over the void.  The delightful graphic is one of Paper Nest Dolls creations.  Both cards are double matted with Recollections paper, and the little green bow is a SU Old Olive ribbon embellishment.


Stamp Etching

This card was inspired by a Technique Challenge (#500) at Splitcoast Stampers written by Lydia Fiedler.  I used Donna Salazar's Drawn Rose Corner for my stamp, and Just Rite Large Fancy Sentiments for the "Love You."  Memento ink, Tim Holts Distress Inks and a sharpie pen finished this pretty card.  I will donate it to the Operation Write Home workshop coming up for Mesquite Papers and Pixels Crafters.


Tuesday, September 23, 2014

Vintage Thanksgiving

This card with a vintage feel was created exclusively for Joan's Touch challenge which was to used distressing and layers for a vintage-feel card.  The adorable puritan girl is hand painted by Valentina in her Thanksgiving Embellishments collection available at the Digital Scrapbooking Studio.  (Valentina's style is quite heritage/victorian/nostalgic...here's her Blog The edges of Tim Holtz Kraft-Core Nostalgic Collection paper (and the photo paper) were distressed with Tim Holtz distresser.  The card is edged with vintage crocheted trim. (A stampin Up product). The Tim Holtz products are available at Joans Gardens, and my SU demonstrator is Kathy Legan.  I will donate this card to this year's Papers N' Pixels sponsored Operation Write Home workshop, scheduled for October 3rd.  

Monday, September 22, 2014

Acrylic Poinsettia

This beautiful card is made with the Anja Square die by Marianne Creatables (LR0242).  The leaves are cut from the largest flower of the Spellbinders Layered Poinsettia (S5-055) die. And the flourish and holly swirl is a Cheery Lynn Border Holly Flourish (B148).  These dies are all available at Joan's Gardens.   The poinsettia is a stamp, (SU Watercolor winter stampset) stamped on clear acetate with Staz-on ink. I added drops of reinker ink in SU's real red and cherry cobbler to 3D Crystal Lacquer and painted it on the stamped side of the acrylic.  I shook micro-fine glitter on the backside before it was dry and added Stickles gold glitter glue to the center (of the stamped side of the acrylic).  After it had dried I cut out the acrylic and adhered it with a popup glue spot to the card base.  The fir branch accents are a Martha Stewart punch burnished with Tim Holtz Distress ink (Forest Moss).  The Merry Christmas gold sticker is from Pop-ups-etc and is a Starform sticker.


Wonderous Wreath Autumn

This card was inspired by Sandi Mac Iver's tutorial "Wonderous Wreath Baby Wipe Technique" available to members at Stamping and Blogging. I used Stampin Up's Wonderous Wreath, and a Fall word stamp from a clearstamp set (manufacturer unknown) with SU inks. This was adhered to Tim Holtz Core-din-ations Kraft paper sandable cardstock for the mat and Tim Holtz Distress ink (Antique Linen) burnishing.   I did not achieve the intensity of color I wanted with the baby-wipe inking on this first try. I trimmed the card with colored pearls, gold thread and raffia, and edged this with a cutting from a die I used recently. 

Thursday, September 18, 2014

Easy DP Christmas Cards

It is very, very easy to create quite a few cards of this design using SU's Textured Impressions Designer Frames embossing folders either cut away as a window or oval cut designer paper for the insert.  The cards are finished with Martha Stewart punched snowflakes, punched from silver holographic paper, and centered with EK Success dimensional snowflake stickers, and silver sentiment and edge stickers by Starform from Pop-Ups Etc


Autumn Birthday and Hello Fall


This autumn Birthday card uses Tim Holtz Texture Fades embossing Folder, Pocket Watches and Steampunk on sanded Kraft Core paper by Tim Holtz from the core-dinations Nostalgic Collection.  I sponged the stencil -THS 501 (Burlap and Bubble)  also by  Tim Holtz.  This is sponged with Spiced Marmelade, Tea Dye, and Old Linen Distress inks. Tim Holtz supplies are available at Joan's Gardens. The Scarecrow is fussy cut and was designed by Trina Clark Walker .  The negative space Happy Birthday sentiment is a Starform Text Sticker #332.  The grosgrain leaf ribbon is edged in gold sticker lines. Stickers are from Popups Etc Little maple leaves are punched from a little Studio G (Walmart) punch.  I cut another of Trina's little scarecrows to use with the message and inside sentiment in this card.  

This stunning card was the demonstration and make-it-and take it workshop today at our Papers 'N Pixels Club meeting.  The technique was taught by one of our Club's SU demonstrators President Kathy Legan.  It uses Crystal Glaze infused with ink then brushed onto the staz-on stamped side of a design.  Before it is dry, microglitter is shaken onto the glaze.  This card is finished with twine and a button, and the art piece is stamped with SU Gorgeous Grunge and Hello Fall stamps.


Tuesday, September 16, 2014

If the Broom Fits

This cute little "Witchkin" was created by Trina Clark Walker and made just adorable Hallowee'n cards. I've used some border trim (black and gold) from Pop-ups-etc, gold stickles, black glaze and crystal glaze, as well as some Washi tape to finish  these cards.


Friday, September 12, 2014

Autumn projects

This card is a darling easel card from Card Buddy Designs.. I've made four of these now! Quick, easy, lots of fun fussy cutting, and easy to assemble and embellish. Careful, some of these UK card designers cards must be resized for US printers and envelope sizes.


This card uses the pretty "Thanks" stamp from the  SU set "Seasonally Scattered." Torn and sanded core-dinations papers, and a diamond EF together with some really weird and fuzzy wired ribbon and a little maple leaf punch finish this. Inks are Tea Stain and Spiced Marmelade--Distress inks by Tim Holtz.  The stamp is touched with gelly roll pens (clear star and orange), and is stamped with Kaleidacolor "Desert Heat".  The inks and papers are available at Joan's Gardens, and the SU products from my SU demonstrator Kathy Legan.

This card uses Washi Tape I got at Michaels, the SU Tags for you Trick or Treat stamp, paper that is the background paper for the first card you see--the one from Card Buddies, and little jack-o'-lantern and spider punches (Studio G -Walmart)

Saturday, September 6, 2014

Bright and Beautiful Stars

These are the first of several cards I have started to cut out and create using SU's new Bright and Beautiful Stampset and accompanying dies.  The stamps are embossed with gold-high-detail Embossing Powder. The stars Embossing Folder is a SU product, embellished with Stickles, gold foiling pen and gelly roll pen accents.  Borders are from pop-ups-etc holographic gold-lines stickers.

The card with the poinsettia is created using Spellbinders S5-055 Layered Poinsettia, a Martha Stewart fir branch punch and holographic gold paper.  The  Merry Christmas sentiment is a sticker that I got from Pop-ups-Etc.  And the Merry and Bright Stamped sentiment is from the Christmas Inner Thoughts Stamp Collection from Just Rite Stamps (CL-04625) The Spellbinders dies, Just Rite Stamps, other card construction papers, glues and other materials can be purchased at Joan's Gardens  and my Stampin UP Representative for the gorgeous stars is my next door neighbor, Kathy Legan. 


 The gold-stars holographic paper is by  Colorbok (Walmart) 


For DGS

This card was a cute kit purchased at Creative Card Downloads and resized for my purposes..  The matching gift card holder I created using a tutorial for gift card holders that I got in 2008 by  Connie Babbert.  Inside I used a cute font "Paw Print".  Papers are designer papers from  from SU. I shot the photo  before I closed the box to mail him his Birthday present this year, so--priority mail's required..


Thursday, September 4, 2014

Coffee and Friends

The card's focus is Trina Clark's Coffee and Friends Snowman.  He's fussy cut embellished with pearls and with glaze pens by Sakura of America.  The background top mat is a heat embossed design with Pearl fine-detail EP using Sizzix 658283 embossing folder and background stamp set "Snowflake Background" set.  The sentiment is part of a  SU stampset Blooming with Kindness, and the matting papers are from SU.  I believe that this card will be one of the project cards at our Papers and Pixels Club upcoming workshop for Operation Write Home this year.  The Sweet  Stamps EP and the EF and stampset are available at Joans Gardens


Tuesday, September 2, 2014

Anja Square Poinsettia

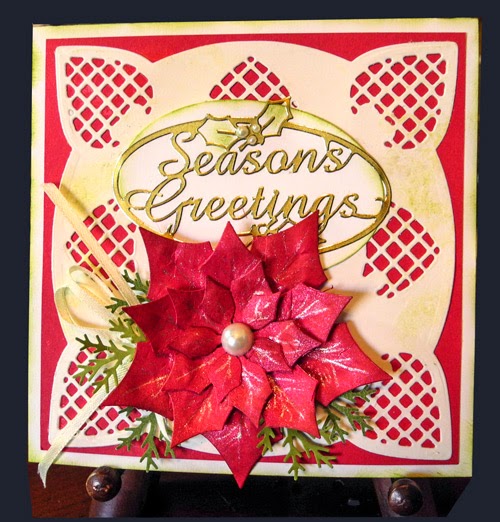
This  4  1/2" square card uses Marianne Creatables LR0242 Anja Square, a very intricate die as a mat for the Season's Greetings sticker and the poinsettia. The poinsettia is Spellbinders S5-055 Layered Poinsettia die.  The fir branch is a Martha Stewart punch.  A Jelly Roll (Clear Star) pen details the poinsettia leaves.  The faint embossing of the Anja Square is touched with Old Olive ink (SU), and the edges are burnished with that ink.  The products to make this card are all available at Joans Gardens, and hopefully, Terri won't have sold out of the Anja Square. (It was manufactured in 2012 and can be hard to find).  I love the lattice hearts--possibilities with that die are endless, of course!  Work a die like this with  Spellbinders Tool-in-One which Terri also sells.  This card IS white, though the photo doesn't share that.


Bowl of Poinsettias

This pretty decoupaged Poinsettia Card (Bowl of Poinsettias) came from Card Buddy Designs.  Everything, including the envelope comes in this card kit.  I print my two-sided cards on Red River Paper Company's Polar Matte.  A touch of gold Stickles and a brush of gel-gloss pen finished this fussy cut card.


Monday, September 1, 2014

Gone Campin!

DGS Ross and his sweetheart Bri-- their nephew, and her sister and her husband --and of course Berkeley and Puff spent Bri's birthday weekend near Lake Hume, CA. It was a  GREAT and restful camping, hiking, playing in the forests, and swimming and fishing kind of weekend and birthday party!!!  Happy Birthday Bri.


I used Karen Schulz'  Rocky Mountain Dream and Path Well Traveled papers, styles and elements for this layout, the Licks and 4 Kisses button is from LCC's Playful Pups kit.  Both are available at the Digital Scrapbooking Studio Store.


Poinsettia Time

I always look forward to starting some of the Poinsettia cards that I love to do each year.  This one uses Marianne Designables #DS0908 and the Spellbinders #S5-055 Layered Poinsettia die, edged with a slightly darker ink, and touched with Gelly Roll Clear Star pen.  The fir branch trim is a Martha Stewart Punch.  All of these are available  at Joan's Gardens  The Seasons Greetings is a sticker that I got from Pop-Ups Etc